
Side Dishes
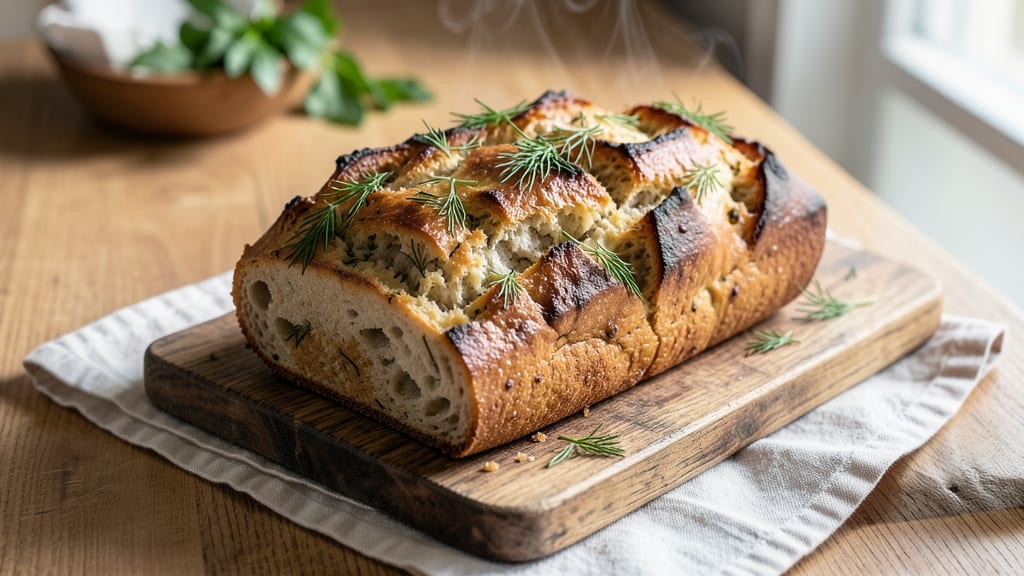
This artisan dill bread recipe delivers a perfect balance of herby crust and pillowy softness—the kind of loaf that transforms any meal into something special. 🌟 The secret lies in a precise blend of flour, yeast, and fresh dill, combined with traditional techniques that create that signature crackly crust while keeping the interior tender.
I've perfected this recipe after years of baking, ensuring every slice offers a burst of flavor and texture that store-bought bread simply can't match.
The process begins with a simple dough made from high-quality flour, yeast, and a touch of salt, all combined with water to create a smooth, elastic base. Fresh dill is folded into the dough during the kneading stage, distributing its bright, aromatic flavor evenly throughout.
The dough then undergoes a two-step proofing process—first at room temperature, then in the refrigerator overnight—which develops deep flavor and makes shaping easier. This careful approach ensures the bread rises properly and achieves that perfect balance of crust and crumb.
What sets this recipe apart is the attention to detail during baking. A hot oven and steam create that signature crisp crust, while precise scoring before baking allows the bread to expand beautifully.
The result is a loaf with a golden, crackly exterior and a soft, airy interior infused with fresh dill. Each slice is packed with flavor, making it ideal for sandwiches, charcuterie boards, or simply enjoyed on its own with butter.
This artisan dill bread is designed to be foolproof for home bakers, with clear instructions and timing that ensure consistent results every time.
Whether you're a seasoned baker or just starting out, this recipe will guide you through each step—from mixing the dough to scoring the loaf—so you can achieve professional-quality bread in your own kitchen. Let's get started on creating your perfect loaf!
Ingredients for artisan dill bread
Fresh dill, warm butter, and high-quality flour—these are the magic ingredients for that perfect herby crust and pillowy interior.
| Ingredient | Amount | Notes |
|---|---|---|
| All-Purpose Flour 🌾 | 4 cups | High-quality, bread flour preferred |
| Active Dry Yeast 🍞 | ¼ oz | Or 2 1/4 tsp (1 packet) |
| Fresh Dill Weeds 🌿 | ½ cup | Stems removed, finely chopped |
| Granulated Sugar 🍚 | 1 tbsp | For yeast activation |
| Salt 🧂 | 1 ½ tsp | Fine sea salt preferred |
| Warm Water 💧 | 1 ¼ cups | 110°F for yeast activation |
| Unsalted Butter 🧈 | ¼ cup | Cold, cubed for dough |
| Large Egg 🥚 | 1 whole | Room temperature |
| Milk 🥛 | ¼ cup | Warmed for dough tenderness |
| Ice Water ❄️ | ½ cup | For final dough adjustment |
| Cornmeal 🌽 | ¼ cup | For dusting baking sheet |
| Egg Wash 🥚 | 1 whole | 1 egg beaten with 1 tbsp water |
| Coarse Sea Salt 🧂 | ½ tsp | For final sprinkle |
The flour is where it all begins. King Arthur or Caputo bread flour gives that signature crackly crust, but all-purpose works in a pinch. Fresh dill is non-negotiable—store-bought dill bundles are your friend here. Look for bright green leaves with no wilt. The yeast should be fresh and active—test it in warm water with sugar to make sure it bubbles within 5-10 minutes. Butter matters too—European-style has more flavor, but any good brand will work. I like Plugrá for that extra richness.
No fresh dill? Dried dill at half the amount works, but you'll lose that bright, fresh flavor. Out of butter? Olive oil at the same quantity keeps the dough tender. The milk can be swapped for plant-based milk if needed—just warm it first. For the egg wash, if you're avoiding eggs, 1 tbsp olive oil plus 1 tbsp water works perfectly. The ice water is key for controlling the dough's final temperature—don't skip it! Prefer a different herb? Chives or parsley work beautifully too, just adjust to taste.
This dough keeps beautifully in the fridge for up to 2 days wrapped tightly in plastic. For longer storage, freeze the shaped loaf for up to 3 months—thaw overnight in the fridge before baking. The baked bread stays fresh for 3-4 days at room temperature, wrapped in a clean towel. Toast slices for extra crispiness, or freeze individual slices for quick sandwiches. Leftovers make amazing croutons—just cube, toss with olive oil, and bake until crispy.
Why You'll Love This Recipe
- No-Knead Magic: Honestly, this dough comes together in five minutes—just mix, let it rise, and bake. No stand mixer, no elbow grease, just warm oven time while you sip coffee or scroll.
- Herb Bomb Flavor: That fresh dill—chopped fine and folded right into the dough—gives every bite a bright, tangy punch. The crust stays crisp, but the inside? Buttery and packed with flavor. (Yes, even on a Tuesday night.)
- Leftovers That Shine: Slice it thick for toast, pack it in lunchboxes, or freeze slices for quick sandwiches. It reheats beautifully—crispy again in seconds—and turns even simple meals into something special.
- Budget-Friendly Staples: Flour, yeast, salt, sugar—these are ingredients you already have. Fresh dill’s the only splurge, and a little goes a long way. One batch feeds a family, and the leftovers stretch for days.
Step-by-step instructions for artisan dill bread
Here's how to create a fragrant, herby bread with a crisp crust and tender crumb—every bite will be packed with dill flavor.
👨🍳 Step 1: Activate the Yeast and Mix the Dough
In a large bowl, whisk together the 4 cups all-purpose flour, 1 tbsp granulated sugar, and 1.5 tsp salt. This dry mix forms the foundation of our dough. In a separate small bowl, combine the 0.25 oz active dry yeast with the 1.25 cups warm water (about 110°F) and let it sit for 5-10 minutes until it becomes foamy. This is your signal the yeast is alive and ready to work.
Once foamy, pour the yeast mixture into the dry ingredients along with the 0.5 cup chopped fresh dill weeds. I like to press the dill into the flour so it distributes evenly throughout the dough. Add the 0.25 cup cold cubed unsalted butter and 0.25 cup warm milk, then mix with a wooden spoon until a shaggy dough forms. The butter adds richness, while the milk keeps the dough tender and easy to handle.
🍳 Step 2: Knead Until Silky Smooth
Turn the dough onto a lightly floured surface and knead for 8-10 minutes until it becomes smooth and elastic. I press down with the heel of my hand and fold the dough over itself, rotating the bowl as I go. You'll know it's ready when it springs back slowly when poked and feels like soft satin. This kneading develops gluten, which gives our bread that perfect chewy texture.
If the dough feels too sticky, add 1 tablespoon of flour at a time until it comes together nicely. The goal is a dough that's smooth, slightly tacky, and just firm enough to hold its shape. Once kneaded, place the dough in a lightly greased bowl, cover with a damp towel, and let it rise in a warm place for 1-2 hours or until it doubles in size. The dill aroma should fill your kitchen—this is when the magic happens!
🔪 Step 3: Shape and Proof the Dough
Once the dough has risen, punch it down to release the air and shape it into a loaf. For a rustic look, I like to form it into a slightly irregular oval shape—this creates beautiful air pockets when baked. Place the shaped dough on a baking sheet dusted with 0.25 cup cornmeal to prevent sticking. Cover it again and let it proof for another 30-45 minutes until it rises slightly and feels springy to the touch.
While the dough proofs, preheat your oven to 375°F. This is the perfect temperature for developing that crisp crust while keeping the inside pillowy. Brush the risen dough with the egg wash (1 whole egg beaten with 1 tbsp water) for a golden finish. Sprinkle the top with 0.5 tsp coarse sea salt—this adds a delightful contrast to the herby flavor.
🔥 Step 4: Bake to Golden Perfection
Bake the bread for 25-30 minutes until it's golden brown and sounds hollow when tapped on the bottom. The crust should be crisp and fragrant with dill, while the interior should be soft and airy. If it browns too quickly, tent the bread with foil to prevent over-browning. The 0.5 cup ice water you reserved? Use it now to create steam—pour it into a small oven-safe dish and place it on the lower rack while baking. This keeps the bread moist and enhances the rise.
Let the bread cool on a wire rack for at least 10 minutes before slicing—this ensures clean cuts and prevents a gummy interior. The aroma of freshly baked dill bread will fill your home, and every slice will reveal a tender crumb infused with bright, fresh dill. Serve warm with butter or your favorite spread for the ultimate experience!
Pro Tips For Making Artisan Dill Bread
- Bloom the Yeast First: Skip mixing yeast directly into flour—it’s lazy. Instead, dissolve it in warm water (110°F) with a pinch of sugar for 5–10 minutes until frothy. This guarantees active yeast, not just hope. I learned this the hard way after baking a dense, flavorless loaf because my yeast was still asleep.
- Chop Dill Like Herbs: Don’t just toss in whole dill stems—they’ll make your bread taste like a bouquet. Roughly chop the leaves (or pulse in a food processor) so the flavor distributes evenly. My grandmother swore by this, and she was right: the aroma hits every bite.
- Don’t Rush the Kneading: Two minutes of pummeling won’t cut it. Knead until the dough springs back slowly when poked (about 8–10 minutes by hand). Over-kneading is easy to spot—it turns tough—but under-kneading means a gummy, sad loaf. I was skeptical until I tried it.
- Steam the Oven: Spritz the loaf with water and bake it on a preheated stone or tray for the first 10 minutes. The steam builds a crisp crust while keeping the inside tender. Sounds weird, but it works—and no, you don’t need a fancy steamer.
Essential equipment for artisan dill bread
Stand Mixer Advantage
My go-to tool for this recipe is a KitchenAid stand mixer with the dough hook attachment—it handles the heavy kneading for me while keeping my hands free. The mixer's consistent speed ensures even gluten development without overworking the dough.
For the yeast activation step, I use the flat beater attachment at low speed for just 30 seconds to blend the warm water, sugar, and yeast.
If you don’t have a mixer, a hand mixer or even strong arms work fine, but be prepared for 10-12 minutes of vigorous kneading. 💪
Dutch Oven Essentials
A heavy-duty Dutch oven (like Le Creuset or All-Clad) is my secret weapon for baking this bread. Its thick walls retain heat evenly, creating that perfect crust-to-crumb ratio.
I preheat the Dutch oven in the oven for 15 minutes before adding the dough, which helps trap steam and develop a crisp exterior.
If you lack a Dutch oven, a cast-iron skillet or even a baking stone works—just place a metal bowl of boiling water on the lower rack to mimic steam. The key is 375°F oven temperature and 25-30 minutes of bake time.
Precision Thermometer
Never skip the instant-read thermometer—it’s non-negotiable for yeast activation and dough temperature. I use a Thermoworks Thermapen ONE to check that my warm water is 110°F (yeast’s ideal temperature) and that my final dough sits at 75-78°F before proofing.
A dough that’s too cold slows fermentation, while one that’s too warm kills the yeast. For proofing, I place my dough in a proofing box (a repurposed insulated cooler) set to 80°F for faster, more consistent rises. No proofing box?
A turned-off oven with a bowl of hot water works just as well.
Scoring Tools Matter
A sharp bread lame (like La Cloche) or even a razor blade is essential for scoring the dough before baking. The 45-degree angle cut allows the bread to expand beautifully while preventing unsightly cracks.
I score just before baking, after the dough has proofed but before it goes into the oven. For a rustic look, make 3-4 diagonal slashes along the top. No lame? A serrated knife works in a pinch—just ensure it’s super sharp to avoid tearing the dough. 🌟
Steam Pan Substitutes
Creating steam is crucial for that crisp crust, and I usually use a small metal bowl filled with ice water on the oven’s lower rack.
But if you’re short on time, try these alternatives: Place a damp towel on the oven rack or spray the oven walls with water before baking. For a Dutch oven, add 1 cup of boiling water to the bottom before placing the dough on top.
The steam should last for the first 10-15 minutes of baking—just remove the pan or towel once the crust starts browning.
Nutrition facts
Frequently asked questions
Can I substitute dried dill for fresh in this recipe?
Yes, but use only half the amount—¼ cup dried dill instead of ½ cup fresh. Fresh dill delivers that bright, vibrant flavor, while dried works better for subtle, consistent seasoning.
Why did my bread turn out dense instead of light and airy?
This usually happens when the yeast is dead (test it in warm water first), the dough wasn't kneaded enough, or the oven wasn't hot enough. Always use fresh yeast, knead until smooth, and preheat your oven to 375°F with steam for that perfect rise.
How can I make this bread gluten-free?
Replace the all-purpose flour with a 1:1 gluten-free flour blend (like Bob's Red Mill) plus ½ tsp xanthan gum per cup. Add 1 extra tablespoon of water to the dough, as gluten-free flours absorb more moisture. Expect a denser texture—gluten-free bread won't rise as dramatically.
Can I bake this bread without a Dutch oven?
Use a baking stone or cast-iron skillet instead. For extra steam, place a metal bowl of boiling water on the lower oven rack during the first 10 minutes of baking. The key is maintaining 375°F oven temperature for that crisp crust.
How long will the baked bread stay fresh?
Wrap the cooled loaf in a clean kitchen towel and store at room temperature for 3-4 days. For longer storage, freeze individual slices wrapped in plastic—they'll stay fresh for up to 3 months. Toast slices for maximum crispiness!